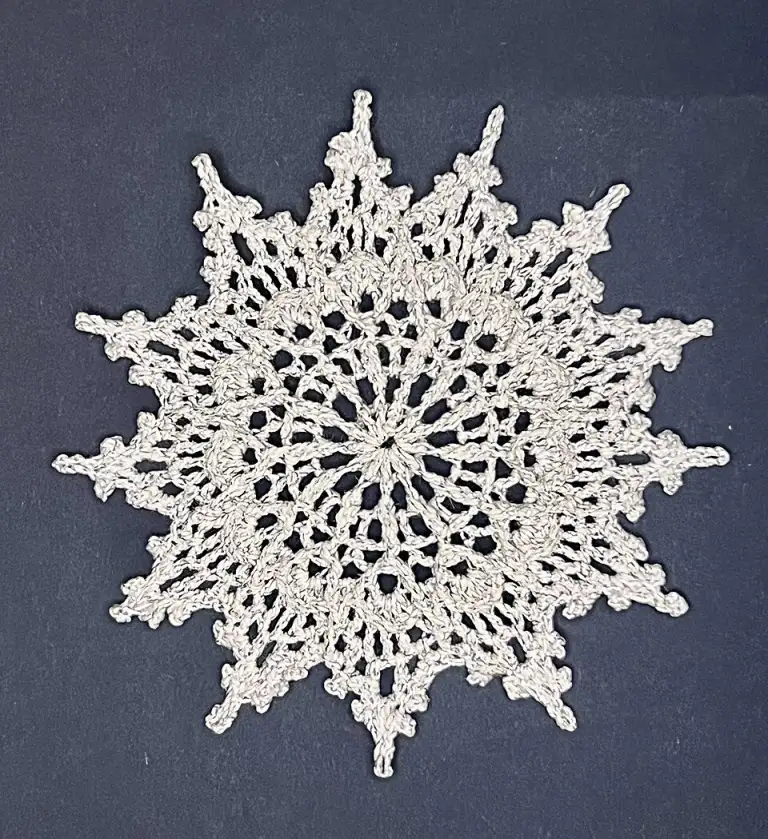
This crochet snowflake pattern collection gives you three different six-point snowflakes to make for Christmas: a simple loop snowflake for complete beginners, a pretty picot snowflake and a lacier branched snowflake. Every pattern is written in UK crochet terms with exact stitch counts at the end of each round.
Quick answer: To crochet a snowflake, work a few rounds into a small ring, building six points with chains, picots or branches, then stiffen and pin it flat to dry. This page has three free six-point snowflakes in UK terms, from a simple beginner loop snowflake to a lacy branched one. Use white DK cotton and a 3.5mm hook (about 7 to 11cm across) and allow 20 to 60 minutes each.
Each crochet snowflake pattern here uses only a few metres of yarn or thread, works up in well under an hour and, once stiffened, keeps its shape for years. Make one for the tree, a handful for a window or a long string for a garland.
Alongside the patterns we explain which yarn and hook to use, how to stiffen and block your snowflakes safely, and lots of ideas for hanging and gifting them.
If you have been looking for a snowflake crochet pattern free of complicated charts, you are in the right place: every round is written out in words, so you can follow along one step at a time.
Why make a crochet snowflake pattern this Christmas?
Snowflakes are one of the most rewarding small makes in crochet. Each one is finished in a single sitting, so you see results quickly, and a crochet snowflake pattern teaches you useful skills such as working in rounds, making picots and counting chain spaces.
- Quick: most snowflakes take between 20 and 60 minutes, depending on the pattern and your yarn.
- Thrifty: scraps of white, cream or silver yarn are all you need.
- Versatile: the same snowflake can be a tree decoration, a gift tag, a card topper or part of a garland.
- Long lasting: a well stiffened snowflake can come out of the decoration box year after year.
If you have already made the simple picot snowflake in our easy crochet Christmas decorations guide, the three designs here are new shapes that use different stitches and constructions, so they sit happily together on the same tree.
What you need for each crochet snowflake pattern
All three patterns use the same small kit. You can work them in DK cotton for a chunkier, quicker snowflake, or in crochet cotton thread for a fine, delicate one.
- Yarn: DK cotton or a cotton blend in white, cream, ice blue or silver. Cotton holds a crisp shape after stiffening. Acrylic works but stays softer.
- Or thread: No. 10 crochet cotton thread for small, lacy snowflakes.
- Hook: 3.5mm (UK 9 / US E-4) for DK, or a steel hook around 1.5mm to 1.75mm for No. 10 thread.
- A tapestry needle (or a fine sewing needle for thread) to weave in ends.
- Scissors and a stitch marker.
- For finishing: PVA glue or spray starch, rustproof pins, a foam board or folded towel, and cling film.
Not sure which hook suits your yarn? The Craft Yarn Council hook size chart lists metric, US and steel hook sizes side by side, and our crochet hooks guide explains handle styles and materials.

Abbreviations (UK terms)
These patterns use UK crochet terms. If you usually follow US patterns, our UK vs US crochet terms guide has a full conversion table.
| UK term | Abbreviation | US equivalent |
|---|---|---|
| chain | ch | chain |
| slip stitch | ss | slip stitch |
| double crochet | dc | single crochet (sc) |
| half treble crochet | htr | half double crochet (hdc) |
| treble crochet | tr | double crochet (dc) |
| space | sp | space |
Picot: 3 ch, then ss into the 3rd ch from the hook. This makes a tiny loop that sits on top of your work.
Working into a space: when a pattern says “in the ch-5 sp”, push your hook under the whole chain loop, not into one of the chains.
Before you start: reading a crochet snowflake pattern
Snowflakes are worked in joined rounds from the centre out. At the end of each round you join with a slip stitch, and the stitch count in brackets tells you what you should have before moving on.
- Count every round. Each crochet snowflake pattern here has six arms, so most counts are a multiple of six. If yours is not, check before you go on.
- Turning chains: where a starting chain “counts as 1 tr”, treat it as a stitch and join into its top. Where it “does not count”, join into the first real stitch.
- Keep the right side facing. You do not turn between rounds in any of these patterns.
- Leave long tails. A 15cm tail is easier to weave in securely.
Patterns 1 and 2 start with a magic ring. If you have not made one before, follow our step-by-step crochet magic ring tutorial first. Pattern 3 starts with a chain ring.
Crochet snowflake pattern 1: simple six-point loop snowflake (beginner)
This is the easiest crochet snowflake pattern here. It uses only chains, double crochet and half trebles, and the six long chain loops form the points. In DK cotton on a 3.5mm hook it measures roughly 7 to 8cm across after blocking, depending on your tension.
Make a magic ring.
Round 1: 1 ch (does not count as a st), 12 dc into the ring. Pull the ring closed and join with a ss to the first dc. (12 dc)
Round 2: 1 ch (does not count), 1 dc in the same st as the join, 5 ch, skip the next dc, *1 dc in the next dc, 5 ch, skip the next dc*; repeat from * to * 4 more times. Join with a ss to the first dc. (6 dc, 6 ch-5 sps)
Round 3: ss into the next ch-5 sp. 1 ch (does not count), then work (2 dc, 1 htr, 6 ch, 1 htr, 2 dc) all in the same ch-5 sp. *(2 dc, 1 htr, 6 ch, 1 htr, 2 dc) in the next ch-5 sp*; repeat from * to * 4 more times. Join with a ss to the first dc. (36 sts and 6 ch-6 point loops) Fasten off.
Each group of 2 dc and 1 htr forms the shoulders of a point, and the 6 ch loop becomes the tip. When you block it, pin each loop out into a narrow point.
Make it bigger: work this crochet snowflake pattern in aran yarn with a 5mm hook for a chunky snowflake to hang on a door.
Crochet snowflake pattern 2: picot snowflake
This crochet snowflake pattern has a little more texture. Shells of trebles form a solid star in the middle, and picots decorate both the points and the dips between them. In DK cotton on a 3.5mm hook it comes out at roughly 8cm across after blocking.
Make a magic ring.
Round 1: 3 ch (counts as 1 tr), 1 tr into the ring, 2 ch, *2 tr into the ring, 2 ch*; repeat from * to * 4 more times. Pull the ring closed and join with a ss to the top of the beginning 3 ch. (12 tr in 6 pairs, 6 ch-2 sps)
Round 2: ss into the next tr and into the next ch-2 sp. 3 ch (counts as 1 tr), (1 tr, 3 ch, 2 tr) in the same ch-2 sp, 1 ch. *(2 tr, 3 ch, 2 tr) in the next ch-2 sp, 1 ch*; repeat from * to * 4 more times. Join with a ss to the top of the beginning 3 ch. (24 tr, 6 ch-3 sps, 6 ch-1 sps)
Round 3: ss into the next tr and into the next ch-3 sp. 2 ch (does not count as a st). *(1 htr, 1 tr, 1 picot, 1 tr, 1 htr) in the ch-3 sp, then (1 dc, 1 picot, 1 dc) in the next ch-1 sp*; repeat from * to * 5 more times, working the next repeat into the next ch-3 sp each time. Join with a ss to the first htr. (36 sts and 12 picots) Fasten off.
The six larger points carry a picot at the tip and the six smaller picots sit between them, which gives it a frosty, twinkly edge.

Crochet snowflake pattern 3: lacy branched snowflake
This is the most delicate crochet snowflake pattern in the set. A lacy centre is topped with six long arms, each finished with a three-loop tip and a pair of side branches. It looks especially pretty in No. 10 crochet thread with a fine steel hook, but it also works in DK cotton with a 3.5mm hook, where it is roughly 9 to 11cm across after blocking.
Make 6 ch and join with a ss to the first ch to form a ring.
Round 1: 1 ch (does not count), 12 dc into the ring. Join with a ss to the first dc. (12 dc)
Round 2: 1 ch (does not count), 1 dc in the same st as the join, 3 ch, skip the next dc, *1 dc in the next dc, 3 ch, skip the next dc*; repeat from * to * 4 more times. Join with a ss to the first dc. (6 dc, 6 ch-3 sps)
Round 3: ss into the next ch-3 sp. 3 ch (counts as 1 tr), (1 tr, 2 ch, 2 tr) in the same ch-3 sp. *(2 tr, 2 ch, 2 tr) in the next ch-3 sp*; repeat from * to * 4 more times. Join with a ss to the top of the beginning 3 ch. (24 tr in 6 shells, 6 ch-2 sps)
Round 4 (arms): ss into the next tr and into the next ch-2 sp. 1 ch (does not count). Then repeat the following six times, once for each shell:
- Work 1 dc into the ch-2 sp of the shell.
- Make an arm: 12 ch. ss into the 4th ch from the hook (this makes the tip loop). 4 ch, ss into the same ch as the last ss. 4 ch, ss into the same ch again (you now have three loops at the tip). ss into each of the next 3 ch of the arm. 3 ch, ss into the same ch as the last ss. 3 ch, ss into the same ch again (two small side branches made). ss into each of the remaining 5 ch of the arm, back to the base.
- Work 1 more dc into the same ch-2 sp.
- 2 ch, 1 dc into the gap between this shell and the next shell, 1 picot, 2 ch.
- Move to the ch-2 sp of the next shell.
After the sixth repeat, join with a ss to the first dc. (6 arms, 18 dc, 6 picots) Fasten off.
Count check for each arm: the 12 ch become the tip loop (the last 4 ch), then 3 ch with side branches, then 5 ch back to the base. That is 4 + 3 + 5 = 12, so you should arrive back exactly beside the dc you started from.
The arms will look floppy until you stiffen and block the snowflake. That is normal. Pinning opens out the loops and makes the branches stand clear.
Crochet snowflake pattern summary
| Pattern | Level | Stitches used | Rounds | Rough size in DK |
|---|---|---|---|---|
| 1. Loop snowflake | Beginner | ch, dc, htr, ss | 3 | 7 to 8cm |
| 2. Picot snowflake | Advanced beginner | ch, dc, htr, tr, ss, picot | 3 | about 8cm |
| 3. Lacy branched snowflake | Improver | ch, dc, tr, ss, picot | 4 | 9 to 11cm |
Sizes for each crochet snowflake pattern are a guide only. Your tension and how firmly you block will change the final measurement, and thread snowflakes come out roughly half the size.
How to stiffen and block a crochet snowflake safely
Straight off the hook, a snowflake from any crochet snowflake pattern is soft and curls at the points. Stiffening and pinning turns it into a crisp, flat decoration. Whatever crochet snowflake pattern you follow, always finish and weave in your ends before you stiffen.
Option 1: diluted PVA glue
- Mix water-based PVA craft glue with roughly an equal amount of water in a small bowl.
- Dip the snowflake and work the mixture through with your fingers.
- Squeeze out the excess and blot with kitchen paper so the holes are not filled with glue.
- Pin it out (see below) and leave it to dry completely, usually overnight or up to 24 hours.
PVA gives the firmest finish and dries clear. Use a little less glue for a softer snowflake.
Option 2: starch
Spray starch, sprayed generously on a pinned snowflake and left to dry, gives a lighter hold that suits thread snowflakes. You can also use a cooled homemade starch of cornflour cooked with water until clear. Starch softens in damp air, so you may need to refresh it each year.
Pinning and blocking
- Cover a foam board, cork board or folded towel with cling film so the glue does not stick.
- Pin the centre first, then pin the tip of each of the six points the same distance from the centre.
- Add pins to open out loops, picots and side branches.
- Use rustproof pins, as ordinary pins can leave marks on wet cotton.
- Leave the snowflake pinned until it is completely dry.
Safety notes: keep glue and starch away from small children and pets, protect your table, and wash your hands after handling. We do not recommend sugar solutions, as they can turn sticky in damp weather. Stiffened decorations are for display, not for playing with.
Choosing yarn and thread for your crochet snowflake pattern
The yarn you choose changes the look of every crochet snowflake pattern more than anything else. Our crochet yarn guide covers fibres and weights in more depth.
- Mercerised cotton DK: smooth, slightly shiny and holds stiffening well. A good all-round choice.
- Crochet thread: gives fine, lacy snowflakes that look lovely on cards and gift tags.
- Metallic blends: add sparkle, but can be slippery. Hold a fine metallic thread together with white cotton for an easier option.
- Acrylic: soft and cheap, fine for practice, but it does not hold a crisp shape as well.
For any crochet snowflake pattern, white is classic, but ice blue, silver grey and pale gold also look wintry. A set of snowflakes in three or four shades of the same colour looks especially smart.
Hanging and display ideas
Whichever crochet snowflake pattern you choose, once your snowflakes are stiff and dry, add a loop of thread, fine ribbon or clear nylon line through the tip of one point.
- Windows: hang snowflakes at different heights on clear thread so they seem to float.
- The tree: lighter thread snowflakes suit the tips of branches; DK snowflakes are sturdy enough nearer the trunk.
- Branches in a vase: hang a few from twigs or a small branch for a simple table display.
- Gift toppers: tie a snowflake into the ribbon on a parcel instead of a bow.
- Cards: glue a small thread snowflake onto the front of a card blank.
Keep all decorations away from candles, fires and hot bulbs, and switch fairy lights off when you leave the house.

Making a crochet snowflake garland
A garland is a lovely way to use several snowflakes at once. Make six to ten snowflakes, using one crochet snowflake pattern or mixing all three, then stiffen and block them all.
- Make a long chain in matching yarn, about 1.5 times the length you want the garland to be. Leave a 20cm tail at each end for tying.
- Lay your snowflakes out in order, spacing them about 10 to 15cm apart.
- Join each snowflake to the chain by sewing through the tip of one point with a few small stitches, or thread the chain through a chain loop on each snowflake.
- Tie a small loop at each end of the garland to hang it from hooks.
For a softer look, skip the chain and thread snowflakes onto a length of fine ribbon instead. Alternate them with wooden beads or small pompoms for a Scandi-style garland, kept well out of the reach of small children.

Troubleshooting your crochet snowflake pattern
| Problem | Likely cause | What to try |
|---|---|---|
| Centre cups like a bowl | Tight tension or too few stitches in Round 1 | Check the count, and try a hook half a size larger. |
| Snowflake ruffles or waves | Extra stitches in a round | Count each round against the brackets in the pattern. |
| Points different lengths | Uneven pinning | Re-wet and pin every tip the same distance from the centre. |
| Arms on Pattern 3 do not reach the base | Miscounted the 12 ch | Count the chain before working back; you need exactly 12. |
| Holes filled with glue | Too much stiffener | Blot well, or poke the holes open with a pin while wet. |
Gifting your snowflakes
A trio of snowflakes, one from each crochet snowflake pattern above, tied with ribbon makes a thoughtful handmade present for a teacher, neighbour or friend. Slip them into a clear bag with a small card noting the yarn used and that they are stiffened, so they should be kept dry.
Every crochet snowflake pattern here makes a flat, light decoration that posts easily in a card. For more festive ideas, browse our Christmas crochet ideas, or make a matching crochet Christmas stocking to hang by the fireplace.
For a bigger make in the same style, try our crochet mandala wall hanging in winter white.
Find more crochet Christmas ornaments for your tree, from stars to peppermint rings.
Frequently asked questions about crochet snowflake pattern
Which crochet snowflake pattern is best for beginners?
Pattern 1, the simple loop snowflake, is the best place to start. It uses only chains, double crochet and half trebles, and there are just three rounds to count.
What yarn is best for a crochet snowflake?
Cotton is the best choice for any crochet snowflake pattern because it holds its shape well after stiffening. Use DK cotton for a quicker, chunkier snowflake, or No. 10 crochet thread for a fine, lacy one.
How do I stiffen a crochet snowflake?
Dip it in PVA glue diluted with roughly an equal amount of water, or use spray starch. Blot off the excess, pin it flat on a covered foam board and leave it to dry completely.
How long does a crochet snowflake pattern take to make?
Most take between 20 and 60 minutes, plus drying time after stiffening. The loop snowflake is the quickest and the lacy branched snowflake takes the longest.
Can I wash a stiffened crochet snowflake?
Washing will soften it. If it gets grubby, rinse it gently in cool water, then re-stiffen, pin and dry it again just as you did the first time.